

Today I'll show one simple tutorial in editing the pictures of SHF action figures. For my first attempt, I decided to give a try in showing on how to edit SHF KR Wizard Infinity into SHF KR Wizard Infinity Dragon Gold, mainly because it's quite simple because it only involves some image extraction and colors shifting.
Preview
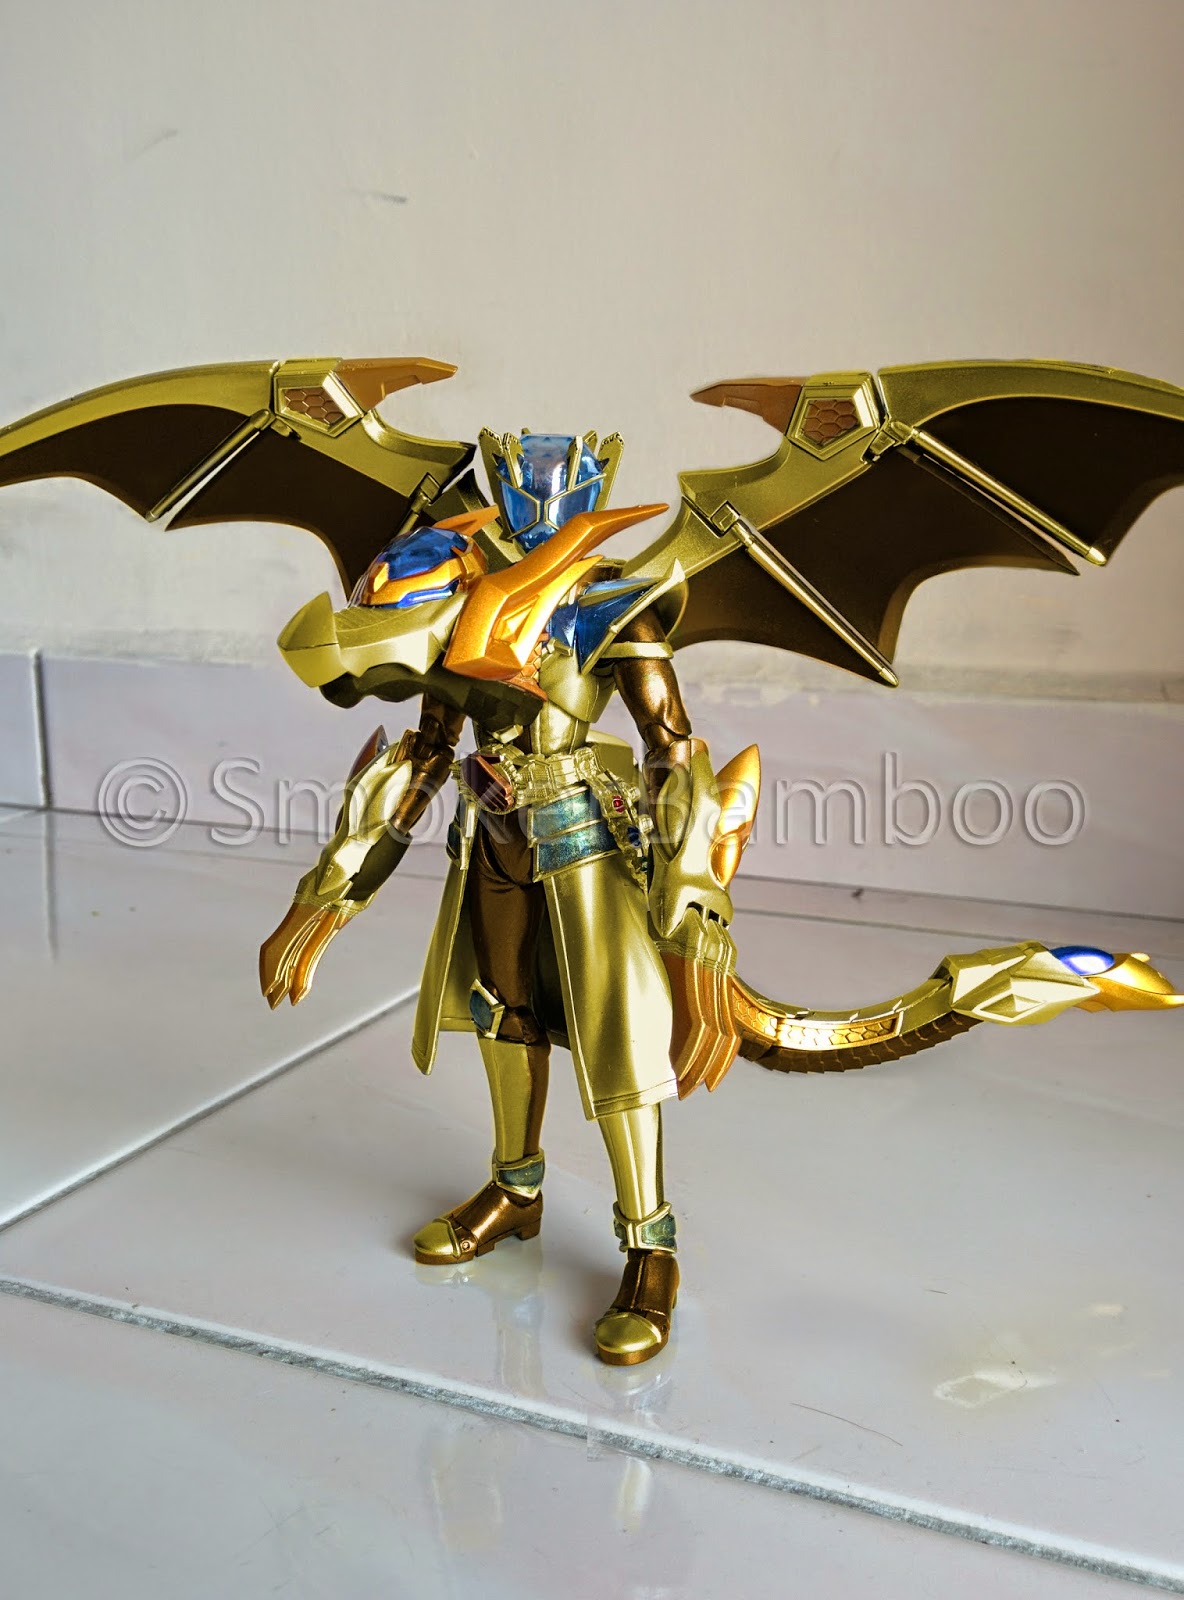
In this simple tutorial we'll edit SHF Kamen Rider Wizard Infinity Style to his Extra Extra Final Form, i.e. Wizard Infinity Dragon Gold:
One final note before we start: This is not some fancy Photoshop tutorial, so don't expect too much from this. Haha. That being said, this tutorial is made for those who have no or very little basic knowledge in using Photoshop, with the aim to share my knowledge. Nevertheless, any comment or feedback is most welcome ^.^
Also, since I'm doing this tutorial for those who are new to Photoshop, I'll explain and show as much details as possible.
Without further adieu, let's start with the tutorial :D
Step 1
Obviously the first step is to collect all the necessary SHF, namely- SHF KR Wizard Infinity Style
- SHF KR Wizard Flame Dragon
- SHF KR Wizard Water Dragon
- SHF KR Wizard Hurricane Dragon
- SHF KR Wizard Land Dragon
Alternatively...
We can actually extract Wizard All Dragon's parts from the available online pictures and apply the parts on your SHF KR Wizard Infinity. But that would require lots of patience as you might need to find more than one pictures with satisfactory resolution to work on.Step 2
Take the photos of your SHF KR Wizard Infinity Style and SHF KR Wizard All Dragon in similar pose:

Step 3
Load the first photo into your Photoshop, then drag and drop the second one as the upper layer. Lower the Opacity of the second photo to around 50% so you can see both layers. The Opacity function for layers can be found in the Layers box which is usually located at the bottom right of the Photoshop workspace.
Press Ctrl + D (or go to Edit > Free Transform) to bring up the Free Transform tool and resize the second layer so that the 2 figures are of the same size:


Note: Please make sure you press Shift when you resize the image to retain the original proportions of the image.
Step 4
The next step is to extract the Drago Skull, Drago Wings, and Drago Tail from SHF Wizard All Dragon. There are many ways to extract image in Photoshop, but my favorite one is always by using Layer Mask. It's similar to Background Erase method, but the good thing about using Layer Mask is that you don't actually erase the unwanted part; you actually 'hide' the part. This is what we termed as "non-destructive editing". So you can always recover the 'hidden' parts whenever necessary.
With the second picture as the selected layer, click the Layer Mask button (see below):

A layer mask will be applied on your selected layer:

As I mentioned earlier, when you use Layer Mask,
you can actually 'hide' the unwanted part of your image. To explain how
it works, let's have a look at the picture below: When you paint black
color on certain area of the Layer Mask, the corresponding area in the picture will be hidden. Contrarily, the area where you painted white on the Layer Mask will remain visible.

Now, back to our image extraction. With the Layer Mask of the second picture selected, click on the Brush tool on the left panel of your workspace. Make sure that the Foreground Color is black.

Then, use the brush to paint black color on the area of the Layer Mask corresponding
to the area we want to hide, which is basically the whole image except
the Drago Skull, Drago Tail and Drago Wings. It's always a good idea to
use 'softer' brush when extracting image to avoid creating hard edges on
your extracted image. To illustrate this, see the comparison below:


As
seen on the left sides of the images, hard brush will creates image
extraction with very defined edges, which normally doesn't look good
when you superimpose it on other image. On the other hand, softer brush
makes blurred edges, which makes your image looks 'more-blended' into
the other image.
So after working on the layer, here's what I got:

Step 5
We
need to split all the 3 Drago parts into separate layers because it's
easier to work on these parts as individual parts. So I've duplicate the
layer into 5 copies, 1 for Drago Skull, 1 for Drago Tail, 1 for the
left Drago Wing, 1 for the right Drago Wing and the last one as backup
(it's always a good practice to keep a backup copy before you work on
anything).
To duplicate layer, simply click and hold on the layer of interest, and drop it onto the Create a new layer icon which looks like a paper with with one folded corner:

Then, paint black color on the unnecessary parts accordingly. For Drago Skull layer, paint black on the other areas except for the Drago Skull area, and same for the rest. It's a good idea to rename your layers so that you won't confuse between them when you work on them. Simply double click on the name of the layer to bring up the typing function, and type in the new name for your layer:

We actually don't have to see the backup layer, so we can make it invisible by clicking on the Visibility icon (the one look like an eye) beside its layer to toggle off its visibility.
To duplicate layer, simply click and hold on the layer of interest, and drop it onto the Create a new layer icon which looks like a paper with with one folded corner:
Then, paint black color on the unnecessary parts accordingly. For Drago Skull layer, paint black on the other areas except for the Drago Skull area, and same for the rest. It's a good idea to rename your layers so that you won't confuse between them when you work on them. Simply double click on the name of the layer to bring up the typing function, and type in the new name for your layer:
We actually don't have to see the backup layer, so we can make it invisible by clicking on the Visibility icon (the one look like an eye) beside its layer to toggle off its visibility.

Then, further refine the edges of each part again, and nudge the parts accordingly for better composition:

If you notice, there
are some missing parts for the Drago Skull, left Drago Wings and also
the Drago Tail because those parts were blocked by the Wizard Flame
Dragon figure:
Step 6

To solve this, I used a manual and not-so-sophisticated way to fix it (haha)
What
I did was I took out the separate parts of the Dragon, and 'overlay'
the parts in front of the original picture, in the same orientation,
then I took pictures of them.


By
using the same image extraction method, I extracted the necessary parts
from these pictures, and put it together with the original picture:

We're close to the final product now but not yet: We need to change the color of Wizard to match the color of his Infinity Dragon Gold form in the show.
Step 7


Also, unlike the diamond armors on the upper part of the body, the diamond armors of the lower body are coated with some sort of thin golden foil:

So these are all the points we need to take into account when adjusting the Hue/Saturation later.
Shifting color is very simple in Photoshop, and one of the ways is to change the Hue/Saturation. There are two ways to do so in Photoshop:
- Use the Image Adjustment function (Go to Image > Adjustment), or
- Use the Adjustment Layer (Go to Layer > New Adjustment Layer)
Go to Layer > New Adjustment Layer > Hue/Saturation... and click on it. Make sure that you've selected the top layer/folder (in my case it's the "Skull" folder) when you do so. This will creates a Hue/Saturation adjustment layer above the selected layer/folder.

A window with the details of the adjustment layer will pop out. You can rename your adjustment layer in this window if you want. Else, just click OK.

An adjustment window will appear and an adjustment layer will be created.

As mentioned earlier, the adjustment layer works the same as layer mask. The changes or adjustments will only take place in area where the corresponding area on the adjustment layer is white (as illustrated in the picture below):

Back to the tutorial, first, we need to turn the ruby on Drago Skull into sapphire blue. To do so, paint the whole adjustment layer in black except for the area corresponding to the ruby of Drago Skull. Then, apply the following Hue/Saturation setting:

You should get similar result as below:

Next, we'll change the golden pearl on the Drago Tail to sapphire blue as well. Similarly, creates a new Hue/Saturation adjustment layer and paint the whole layer black, leaving only the golden pearl area in white color. Then apply the following setting:


Now, finally we can turn our figure into gold color. To do so, creates another Hue/Saturation adjustment layer, and apply the following settings:


Note: Remember to tick the Colorize option at the bottom.
Remember that previously we said that the diamond armors of the lower body part are coated with thin golden foil. To create this effect, just paint white color on those area, but with lower brush Opacity:

You should get similar result as below:

Now compare the picture above with the screenshot from the movie:

Note that Wizard's clothes and the black part on the Drago Wings & Drago Tail should be more "golden" in color, rather than the metallic black. So, we're gonna fix that by applying another Hue/Saturation adjustment layer with the following setting:

And... Voila! The SHF KR Wizard Infinity just turned into SHF KR Wizard Infinity Dragon Gold:

Final Product
